Decorate gingerbread panels with Candy Melts Candy before assembly. Re-warm candy as necessary when decorating.
Melt candy. Follow package directions to melt one bag candy in each color. Add 2 tbsp. E-Z Thin to each color to thin. Place melted candy colors in separate bags. Reserve remaining 6 oz. of each color of candy.
Cover gingerbread with thinned melted candy. Place gingerbread panels on grid over parchment paper. Cut ½ in. off end of bags and pipe candy over gingerbread panels, following color guidelines below. Tap grid gently to smooth candy. Move candy-coated pieces to parchment paper-covered boards. Chill to set, 10 to 15 minutes.
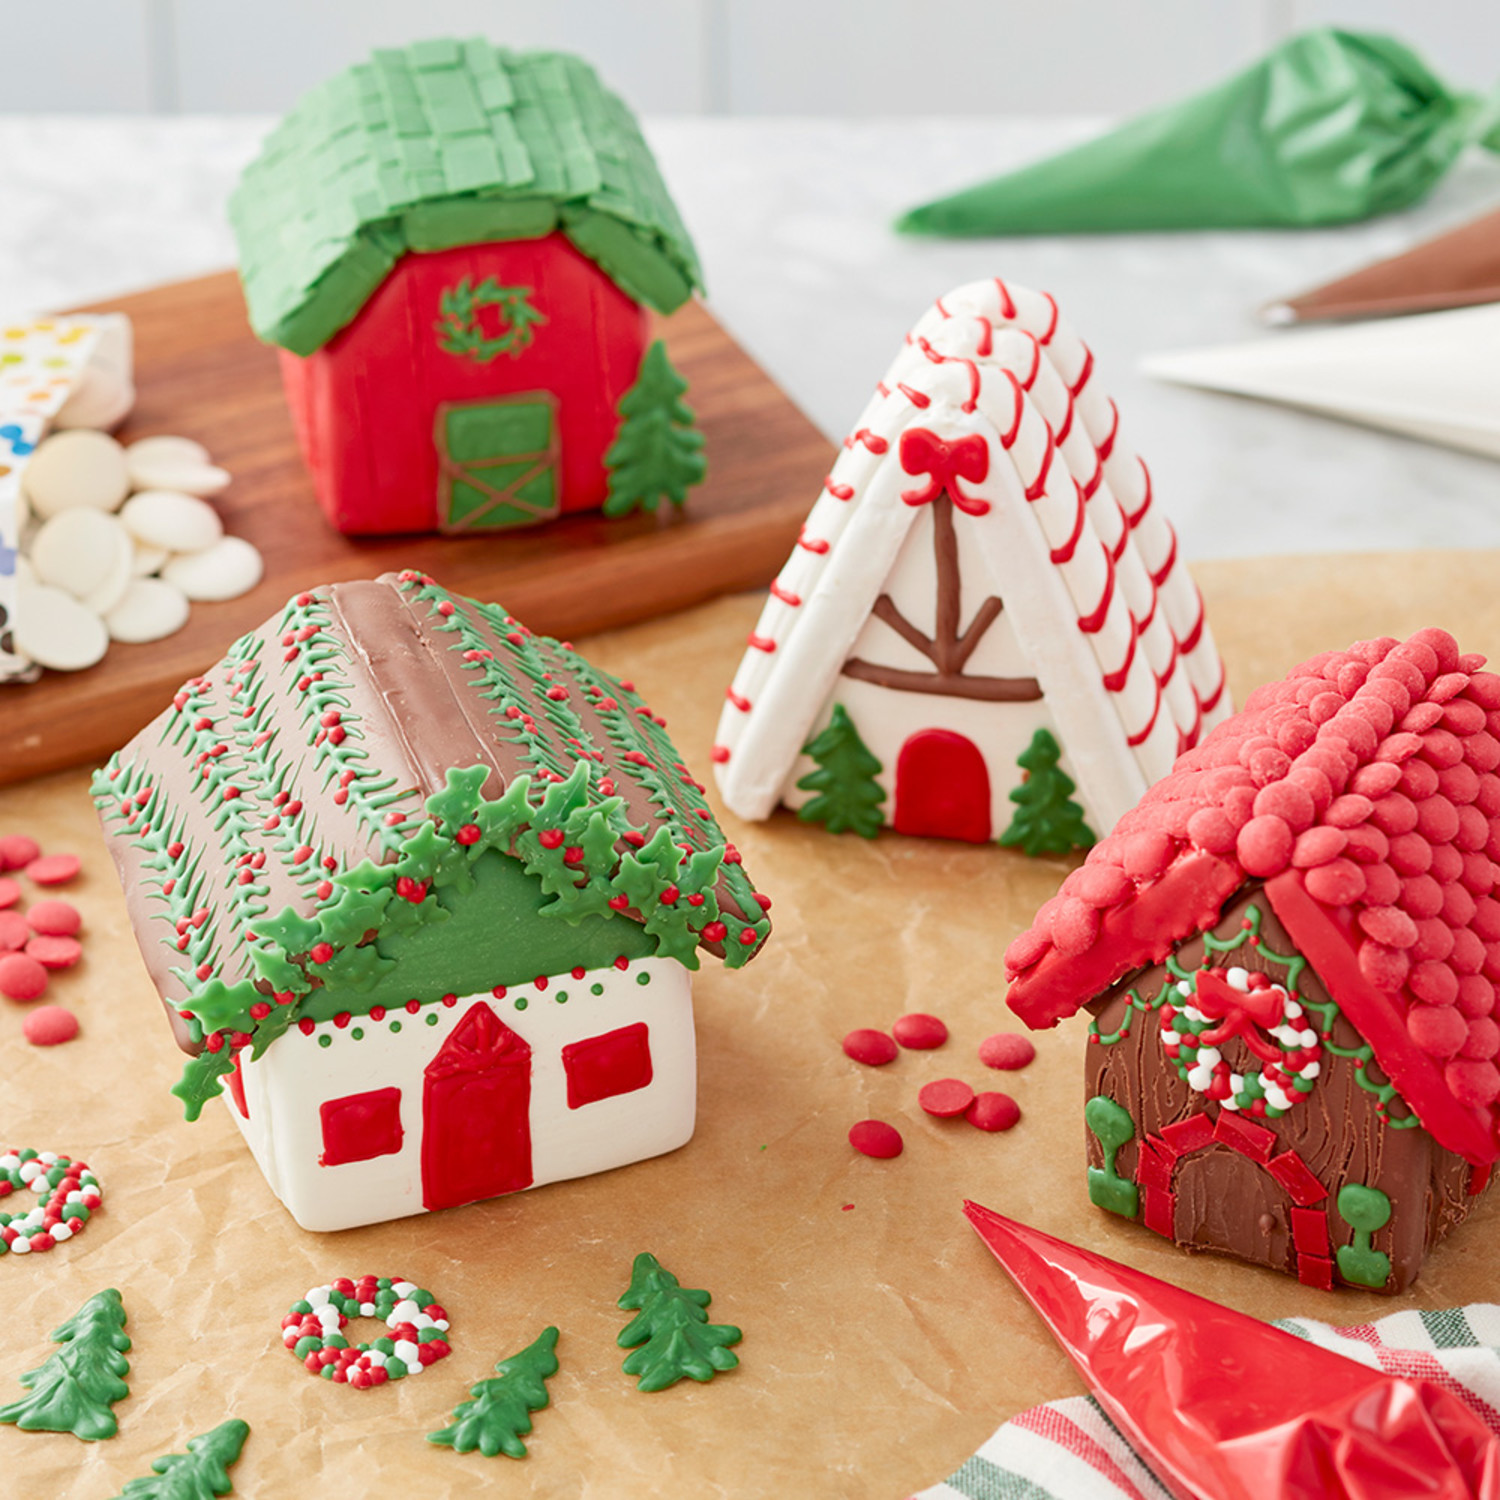
A-Frame: Cover front, back and roof panels in white candy.
Holly House: Cover roof panels in light cocoa candy. Cover side panels in white candy. Cover front and back panels in white candy from base to 1 ¾ in. high. Chill, then cover remaining area in green melted candy.
Rustic Cabin: Cover roof panels in red melted candy. Cover front, back and side panels in light cocoa candy.
Barn: Cover roof panels in green melted candy. Cover front, back and side panels in red candy.
Decorate Houses: Follow package directions to melt reserved candy. Use melted candy to pipe details on houses.
A-Frame: Fill three bags; one with light cocoa candy, one with green candy, and one with red candy. Cut ¼ in. off end of each bag. On a parchment paper-covered board, pipe two 1 ¼ in. high trees in green and one ¾ in. wide bow in red candy. Chill 5 to 10 minutes. Fill a bag with white candy, cut ½ in. off end of bag. Pipe three lines on roof panels. Chill 5 to 10 minutes. Use red candy to pipe door and diagonal stripes across white lines on roof. Use light cocoa to pipe divisions under roof peak.
Holly House: Use red candy bag to pipe peaked door and windows. Let set. Use green candy bag to pipe 22 small holly leaves, plus extra for breakage, on parchment paper-covered board. Chill 5 to 10 minutes. Use red candy to pipe door details. Let set. Pipe red and green candy dots, along color division on front and back panels. Use red candy to pipe garland on roof.
Rustic Cabin: Use toothpick to etch woodgrain into front, back and side panels. Use light cocoa bag to outline door on front. Pipe 1 x 3/8 in. windows on sides and pipe a door handle. Use green candy bag to pipe garland under eaves. Use red candy to pipe dots on garland and window shutters. Wreath: Mark a 1 in. circle on back of parchment paper. Turn paper over and tape to board. Pipe random dots on red, green and white candy along circle. Pipe ½ in. bow using red candy. Use green candy to pipe trees in pots. Chill 10 to 15 minutes.
Barn: Use toothpick and ruler to etch wood planks ½ in. apart on front, back and sides. Use green candy to fill in door and pipe pulled dot wreath above door, ¾ in. wide. Use green candy to pipe 1 ½ in. tall tree. Chill 5 to 10 minutes. Use light cocoa candy to outline door. Use red candy to pipe dots on wreath.
Assemble and finish houses. Assemble houses following instruction in package, using candy instead of icing.
Chill assembled houses 10 to 15 minutes before adding embellishments to houses.
A-Frame: Assemble house with white candy.
Holly House: Assemble house with white candy.
Rustic Cabin: Assemble house with light cocoa candy.
Barn: Assemble house with red candy.


