Bake cakes. Pour ½ cup tan batter in first prepared cake pan. Spread evenly with spatula.
Prepare three decorating bags with tip 8. Fill separately with black, brown and tan batter. Using bag with black batter, pipe four irregular circles in pan. Cover black circles using bag with brown batter.
Using bag with tan batter, fill in gaps between circles.
Repeat, piping black batter circles on top of brown circles one more time in same pan. Fill in and cover with tan batter. Tap lightly on surface to remove air bubbles.
Repeat entire step with remaining two pans.
Bake and cool following recipe instructions.
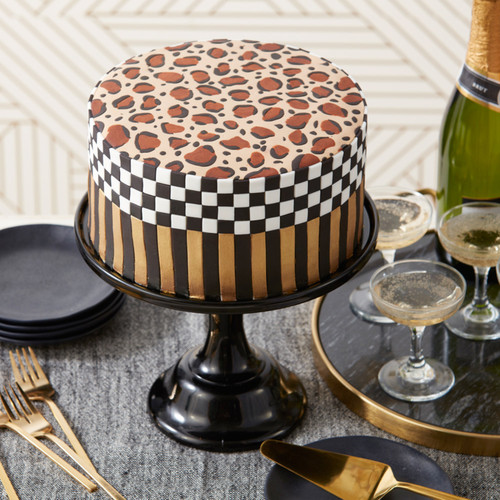
Decorate cake. Using fondant roller with orange guide rings, roll out 28 oz. white fondant. Cut strip measuring 29 in. long and 5 in. wide. Wrap around cake, smoothing and trimming as necessary.
Helpful Tip: To roll fondant around cake, roll strip on fondant roller, starting at narrow side. Place against cake, then unroll onto cake. Make sure icing is still tacky before adhering fondant to cake.
Using fondant roller with orange guide rings, roll out tan fondant to a 9 in. circle. Using a damp brush, attach small pieces of brown fondant to tan fondant (flatten brown fondant slightly with fingers).
Using black fondant, roll small logs between fingers. Attach to outer edges of brown spots. Make small black dots of fondant, pressing between brown spots.
Using fondant roller, gently roll over circle to inlay spots. Position fondant on top of cake, trimming off excess as necessary.
Using fondant roller with GUIDE RINGS, roll out black fondant. Cut 112 squares measuring ½ in. in size. Also cut 28 strips measuring ½ in. wide and 3 in. long. Repeat with white fondant. Keep squares and strips covered with plastic wrap to prevent drying.
Using decorating brush, lightly brush sides of cake with shortening. Attach black and white squares to top half of cake, creating checkerboard pattern (should be 4 rows of black and white squares).
Position black strips vertically around bottom half of cake, trimming as necessary. Black strips should line up with white squares from previous row.
Using decorating brush and gold metallic paint, paint white strips gold.


