
Lemon Cake Filling
1 hr
Beginner
30% Off Clearance Items!

Favorite Cake Mix or Recipe
Creamy White Decorator Icing, 4 lb. Tub
Black Icing Color, 1 oz.
Golden Yellow Icing Color, 1 oz.
Naturally Flavored Rich Chocolate Icing, 16 oz.
Round Cake Decorating Tip 2
Non-Stick Cooling Grid - 14.5 x 20-Inch - Cooling Rack
Cake Icing Smoother
Open Star Cake Decorating Tip 16
Round Cake Decorating Tip 3
12-Inch Disposable Decorating Bags, 24-Count - 12-Inch Disposable Piping Bags
Standard Coupler
Performance Aluminum Round Cake Pan, 6-Inch
Open Star Cake Decorating Tip 1M
6-Inch Round Cake Boards, 10-Count
scissors
Decorator Preferred 9inch Angled Spatula
Round Cake Decorating Tip 5
Icing Smoother Comb Set - 3 Piece
Cake Leveler, Small, 10-Inch
Toothpick
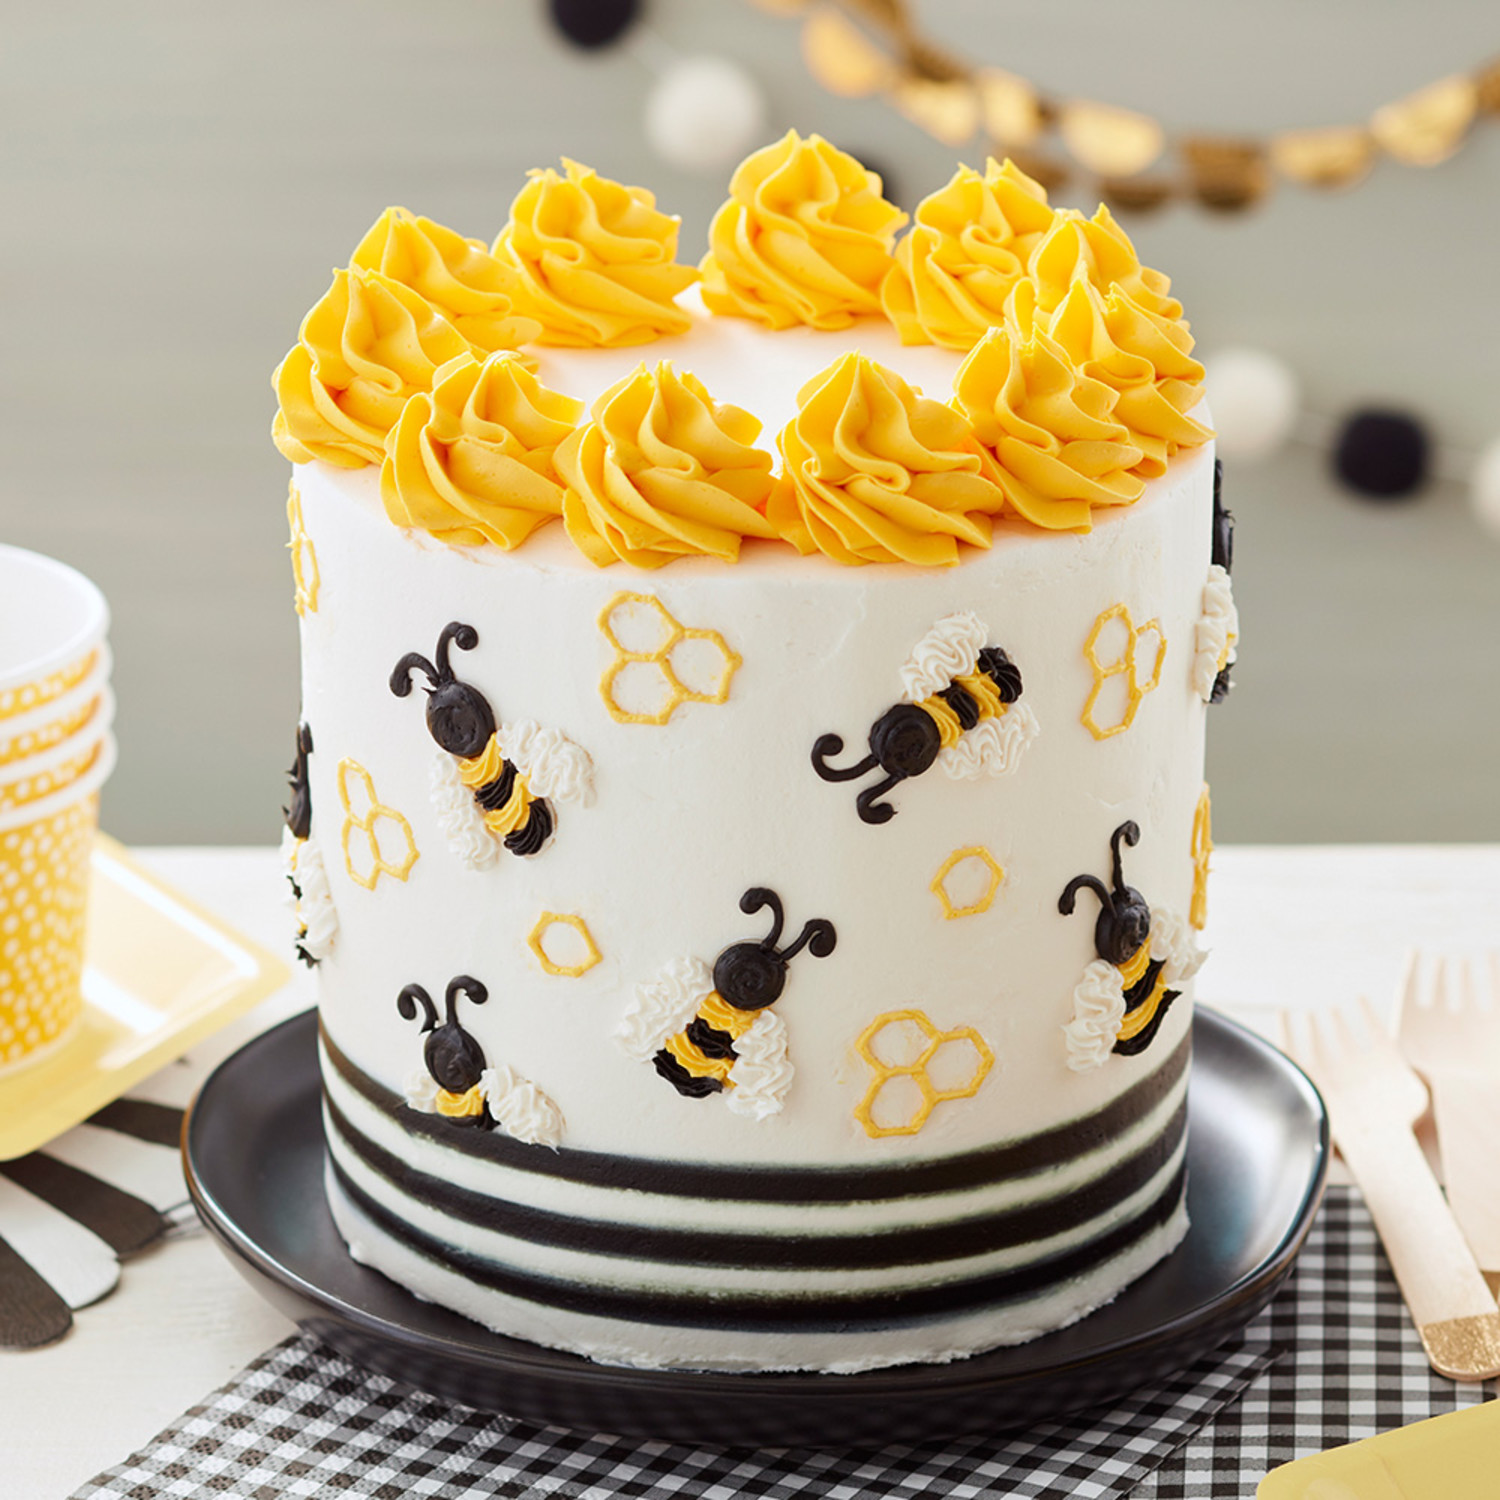
Bake cake. Prepare cake batter following recipe instructions. Bake and cool three cake layers. Level, fill and stack layers on cake circle for 6 in. high cake. Place cake on turntable.
Using icing smoother and creamy white icing, ice cake smooth. Using square-edged combing tool, comb cake.
Tint icing. Using Black icing color, tint 1 cup chocolate icing black. Using Golden Yellow icing color, tint 2½ cups white icing yellow. Set yellow icing aside for later step.
Prepare two decorating bags, separately, with black and white icing. Cut ½ in. off tip of bags. Starting at bottom, pipe black icing in every other indented line, for a total of 3 black lines. Using white icing, fill in remaining indented lines.
Using icing smoother, smooth icing.
Reserve remaining black and white icing.
Make bees. Prepare two decorating bags with couplers. Prepare one bag with reserved yellow icing and tip 16. Prepare second bag with black icing and tip 5.
Prepare third decorating bag with tip 16. Fill with remaining white icing.
Using toothpick, draw bee shapes and honeycombs around sides of cake. For round bee heads, use large end of standard-sized tip to mark circle in icing.
Using black icing with tip 5, use dot technique to pipe bee heads. Switch to tip 16.
Using black icing with tip 16 and yellow icing with tip 16, pipe alternating stripes for bodies of bees. Using white icing with tip 16, use zigzag technique to pipe wings of bees. Reserve remaining yellow icing.
Switch black icing bag to tip 3; pipe antennas. Switch yellow icing bag to tip 2; pipe outline for honeycombs.
The Zigzag is a popular way to fill in outlined areas, perfect for ribbed sweater and cuff effects. You can also use tight zigzags to cover the entire side of your cake - they look great!
Perfect for classic borders or cloudlike decorations, dots are a versatile technique that can be piped in a range of sizes. The dot technique can be used as a simple border for cakes and cookies, as well as for icing cupcakes or piping meringues.


4 hr 30 min
1 hr


